Most Ontario homeowners replacing their windows do not need a building permit, but there is a short list of exceptions that catch people every year. The rule that matters comes from the Ontario Building Code (O. Reg. 332/12): if the replacement is like-for-like and you are not changing the structural opening or altering an egress requirement, no permit is needed. If any of those things change, the answer flips. We get this question on almost every window replacement consultation in the GTA, so here is the framework we use on site to figure out the answer in under five minutes.
Skipping the permit check costs more than the permit itself. An unpermitted opening change shows up on a future home inspection, on title searches, and sometimes during insurance claims. The good news: most replacements truly are exempt, and the ones that are not have a clear paper trail you can follow.
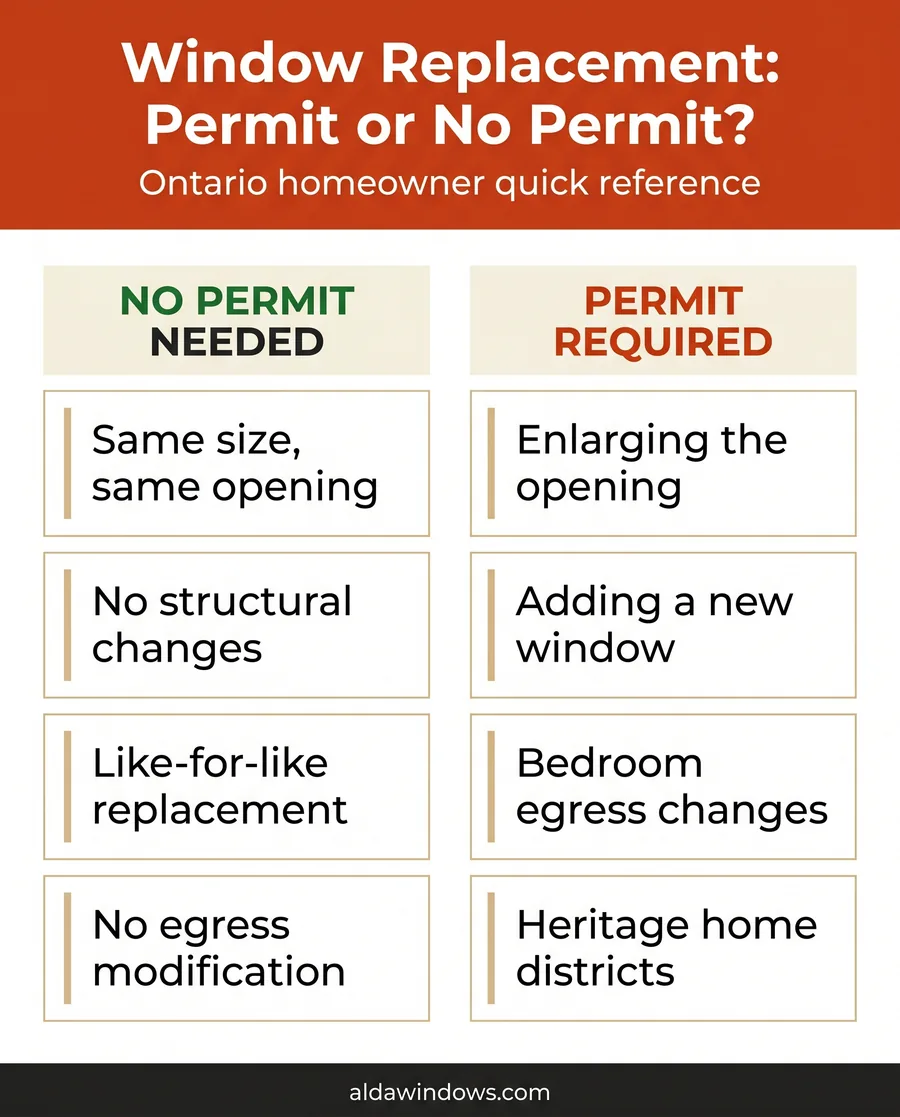
When you do not need a permit
The Ontario Building Code treats most window replacements as routine maintenance. If your installer pops the old unit out, drops a new one of the same size into the same rough opening, and seals it up, that is exempt under section 1.3 of Division C. Here is the practical version of that rule.
The opening size does not change. Width, height, and sill height all stay the same. The new window fits inside the existing rough opening with no cutting, no enlarging, no bricking-up.
The window type stays the same or improves. A casement replacing a casement is fine. A casement replacing a slider is also fine, because both meet the same code requirements. What you cannot do without a permit is downgrade a window that was meeting bedroom egress to one that no longer does (more on that below).
The structure does not change. No header modifications, no removal of king studs or trimmer studs, no change to the wall sheathing or framing.
If all three apply, you are doing a like-for-like replacement and the city does not need to hear from you. This covers the vast majority of window jobs in Toronto-area homes, including most bungalow, side-split, and 1960s-to-1990s subdivision builds where the original openings were already sized to the homes the buyers wanted.
Did you know?
The “like-for-like” exemption applies even if you upgrade from single-pane to triple-pane, change frame material from aluminum to vinyl, or add Low-E glazing and argon fill. The code does not care about glass package or frame material. It cares about the hole in the wall.

When a permit is required
Once you are altering the opening, the answer changes immediately. These are the four scenarios that flip the question from no permit to permit required, and the order matters because the first one is the most common surprise.
Enlarging the opening. Going from a 36-inch wide window to a 48-inch wide window means cutting siding, brick, or framing. That triggers a permit because you have changed the structure. The new header has to be sized for the wider span, and the city wants to see that calculation.
Cutting a new opening. Adding a window where none existed before is always a permit. This applies whether the new opening is in an exterior wall, a basement wall, or a garage that you are converting. New egress on a bedroom or new daylight on a basement bedroom both fall here.
Removing a window and bricking it up. Yes, removing a window is also a permit job. The wall has to be made structurally and thermally compliant after the window is gone, and the city wants the proof.
Changing a bedroom window in a way that affects egress. If your existing bedroom window meets the egress requirement and the replacement does not, you need a permit and a code review. The most common version of this is replacing a horizontally-sliding window with a casement that, despite being the same nominal size, has a smaller clear opening because of the operator hardware.
Red flag
If your home is in a designated heritage district (Cabbagetown, Riverdale, Yorkville, Old Towne Markham, parts of Niagara-on-the-Lake), even like-for-like replacements may need a heritage permit on top of the building permit. The trigger is changing visible exterior materials or proportions. Check with your local heritage office before booking the install.
Egress rules for bedroom windows
This is the rule that surprises homeowners most often, so it gets its own section. Every bedroom in an Ontario home that is below grade or that does not have a direct exit to the outside needs at least one window that meets the egress requirement. The window must have an unobstructed openable area of at least 0.35 square metres (about 3.77 square feet), with no dimension less than 380 mm (15 inches), and the sill no higher than 1.5 metres above the bedroom floor. Section 9.9.10 of the Ontario Building Code spells this out.
Where this catches people: a 30 by 40-inch sliding window has a nominal area larger than 0.35 square metres, but only one half slides open, and the operator track eats into the openable area. The actual unobstructed opening might be 28 by 19 inches, which is just below the 0.35 threshold. Replacing it with a casement of the same nominal size that swings fully open usually fixes this and improves egress. But replacing it with a smaller casement to match the cleaner exterior look could put the bedroom out of code.
Basement bedrooms, attic conversions, and finished rec rooms used as sleeping spaces all fall under this rule. If the existing window does not meet egress and you are replacing it, the new one needs to meet egress whether you wanted to deal with that or not. The good news: a code-compliant casement upgrade is straightforward and we walk every Vaughan window installation through the egress calculation before we order the unit.
Pro tip
When you spec a bedroom replacement window, ask the installer for the manufacturer’s clear opening dimensions. Marketing brochures show frame size; the egress calculation needs the clear opening. A reputable supplier provides this number on the quote without being asked. If they cannot or will not, that is a sign to keep shopping.
How to apply for a permit
Where the answer was no permit, you stop here. Where the answer was permit required, here is what the application looks like for a typical Ontario municipality. The process is similar across Toronto, Mississauga, Brampton, Vaughan, and Markham, with small variations in fees and review timelines.
- Drawings of the existing condition. A simple elevation showing the window, its size, and where it sits on the wall. A site sketch is fine for most jobs. Heritage districts need more detail.
- Drawings of the proposed window. Same elevation with the new opening dimensions, header sizing, and any framing changes called out. For wider openings, the header span needs to be calculated by someone qualified, which usually means an engineer or a registered designer with BCIN.
- Manufacturer specs and energy ratings. The window’s NRCan ENERGY STAR certification details and U-value. The Ontario Building Code references ENERGY STAR Canada certified windows as the path to compliance for the energy section.
- Application form and fee. Submit through your city’s online building permit portal. Most cities accept the application same-day; review takes 2 to 6 weeks.
- Inspection after install. A building inspector visits to confirm the rough opening, header, flashing, and air-sealing match the approved drawings. Once they sign off, the permit is closed.

Permit cost and timeline by city
For permittable window work, the budget is dominated by the engineering or designer fee, not the permit itself. Here is the rough range across the GTA in 2026 for a single-window enlargement or a new opening cut, including the permit fee, the BCIN designer or engineer’s drawing package, and the back-and-forth review time.
| Municipality | Permit fee | Designer / engineer drawings | Typical review time |
|---|---|---|---|
| Toronto | $200 to $500 | $700 to $1,800 | 3 to 6 weeks |
| Mississauga | $180 to $420 | $700 to $1,600 | 2 to 4 weeks |
| Vaughan | $200 to $450 | $700 to $1,700 | 2 to 5 weeks |
| Markham | $190 to $400 | $700 to $1,600 | 2 to 4 weeks |
| Brampton | $170 to $380 | $650 to $1,500 | 2 to 4 weeks |
Most homeowners are surprised by how little the city portion costs and how much the drawing package costs. That is the cost of getting a structural element done right; the alternative is a structural problem you will pay much more to fix later.
Disclaimer
This article is for general guidance only. Permit rules, fees, and processing times change. Costs vary based on the specific work and the year of the application. ALDA Windows and Doors is not liable for outcomes from actions taken based on this content. Always confirm the current requirements with your municipal building department before starting work, and use a registered designer or licensed engineer for any structural drawings.
What to do next
The right next step depends on which side of the line your job sits on. If your replacement is like-for-like, book the install and skip the city. If your job changes the opening, get the drawings before you order glass. Either way, the assessment is free.
- Step 1. Pull a tape measure and confirm whether the new window will fit the existing rough opening. If yes, no permit needed.
- Step 2. If the opening changes, request a free site assessment so we can document the existing condition and refer you to a BCIN designer if drawings are required.
- Step 3. For bedroom windows, ask the installer to confirm the clear opening dimensions before ordering. Egress is the most common surprise.
- Step 4. Schedule the install. Like-for-like replacements take a single day for an average GTA home. Permittable jobs add the city review window.
Get a permit-aware window replacement quote
Our installers walk every job through the permit decision before we book it. No surprises.
Book a free GTA estimateSources and references
- Government of Ontario, Ontario Building Code (O. Reg. 332/12)
- City of Toronto, Toronto Building Division and permit applications
- Natural Resources Canada, ENERGY STAR Canada certified windows
Frequently asked questions

Written by
Marco B.
Senior Window & Door Installer | 18 Years GTA Experience
Marco is a senior installation lead with 18 years on residential window and door retrofits across Toronto, Mississauga, and York Region. He has personally installed thousands of vinyl, fibreglass, and aluminum-clad units, and trains apprentice crews on flashing, foam sealing, and brick-mould tie-ins for older GTA homes.